
The Ultimate Guide to Set Up an Online Store on Squarespace
Setting up an online store on Squarespace can seem complicated, but it doesn’t have to be.
Having gone through this process many times, I’ve gathered the tips and resources to help you set up a Squarespace online store without frustration.
By following the steps in this post, you can launch your online store in just a few days (or hours if you have a small shop!).
To make following along easier, you can grab the Squarespace Ecommerce Checklist. It has every step in this post plus a loads more ecommerce best practices.

Know Squarespace Ecommerce Limitations
There are many website platforms that can be home to your online store. Before taking any further step, let’s make sure Squarespace is right for you and your business.
Squarespace’s strength is in creating beautiful web pages without coding. It is the ideal choice if you need a website that does both selling and providing marketing information, as you can customize the layouts fairly freely without the constraints of templates.
Squarespace’s ease of use and reasonable prices also make it a great choice for new or small online stores. You don’t need coding experience or hire a developer to build the site. The lowest pricing plan for a fully functional online store on Squarespace is $18/month.
That being said, Squarespace is not for everyone. Here are the limitations of Squarespace ecommerce:
Payment gateway options are limited to PayPal, Stripe, and Square only (though you can integrate Squarespace with Shopify buy button quite easily)
Cannot sell in multi-currency
POS/Square integration is only available in the US
Automated shipping cost calculation is only available in the US
Automatic tax calculation is only available in the US
Limited third-party app integrations (to be fair, the important features are all built-in; but, if you have a large store and want to streamline processes like inventory or accounting, there aren’t many options in Squarespace)
Additionally, there are two current versions of Squarespace: 7.1 and 7.0. If you’ve been with Squarespace prior to 2020 and still have the 7.0 version, there’s a limit of 200 items/store. Squarespace 7.1 offers a much more generous 10,000 items and also the ability to filter products with subcategories.
If you’re still unsure about Squarespace, check out this Squarespace pros and cons article.
Squarespace Ecommerce Pricing Plans
Squarespace has three pricing plans with e-commerce functions:
Business Plan ($18/mo)
This plan is great for businesses with low-volume sales or has a limited budget to set up an online store. However, it comes with a 3% transaction fee, which makes it a bad choice compared to the next plan if you sell more than $3200/year.
-
Sell unlimited products or services
Ability to accept donation
3% transaction fees
Checkout on Squarespace URL
Basic Commerce Plan ($26/mo)
With no transaction fees and a fuller set of features, this plan is great for established businesses or any shops that want to provide a high-quality customer experience. It is also the ideal choice for businesses that sell services or digital products.
-
Sell unlimited products or services
No transaction fees
Checkout on your domain
Ability to display related products
Ability to display limited availability labels (eg. "only 3 left")
Allow users to join product waitlists
Allow users to create accounts
Full access to e-commerce analytics
Sell on Instagram
Advanced Commerce Plan ($40/mo)
This plan is ideal for large e-commerce businesses who want robust features such as abandoned cart recovery and custom integrations to optimize conversion & streamline processes. It is also the only Squarespace plan that allows selling subscriptions.
-
Everything in Basic Commerce
Ability to sell subscription
Automatic, real-time calculation of shipping fees from USPS, FedEx, and UPS (US only)
Control shipping rules using ZIP code (US, Canada)
Apply discounts automatically
Abandoned cart recovery
API access for custom integrations

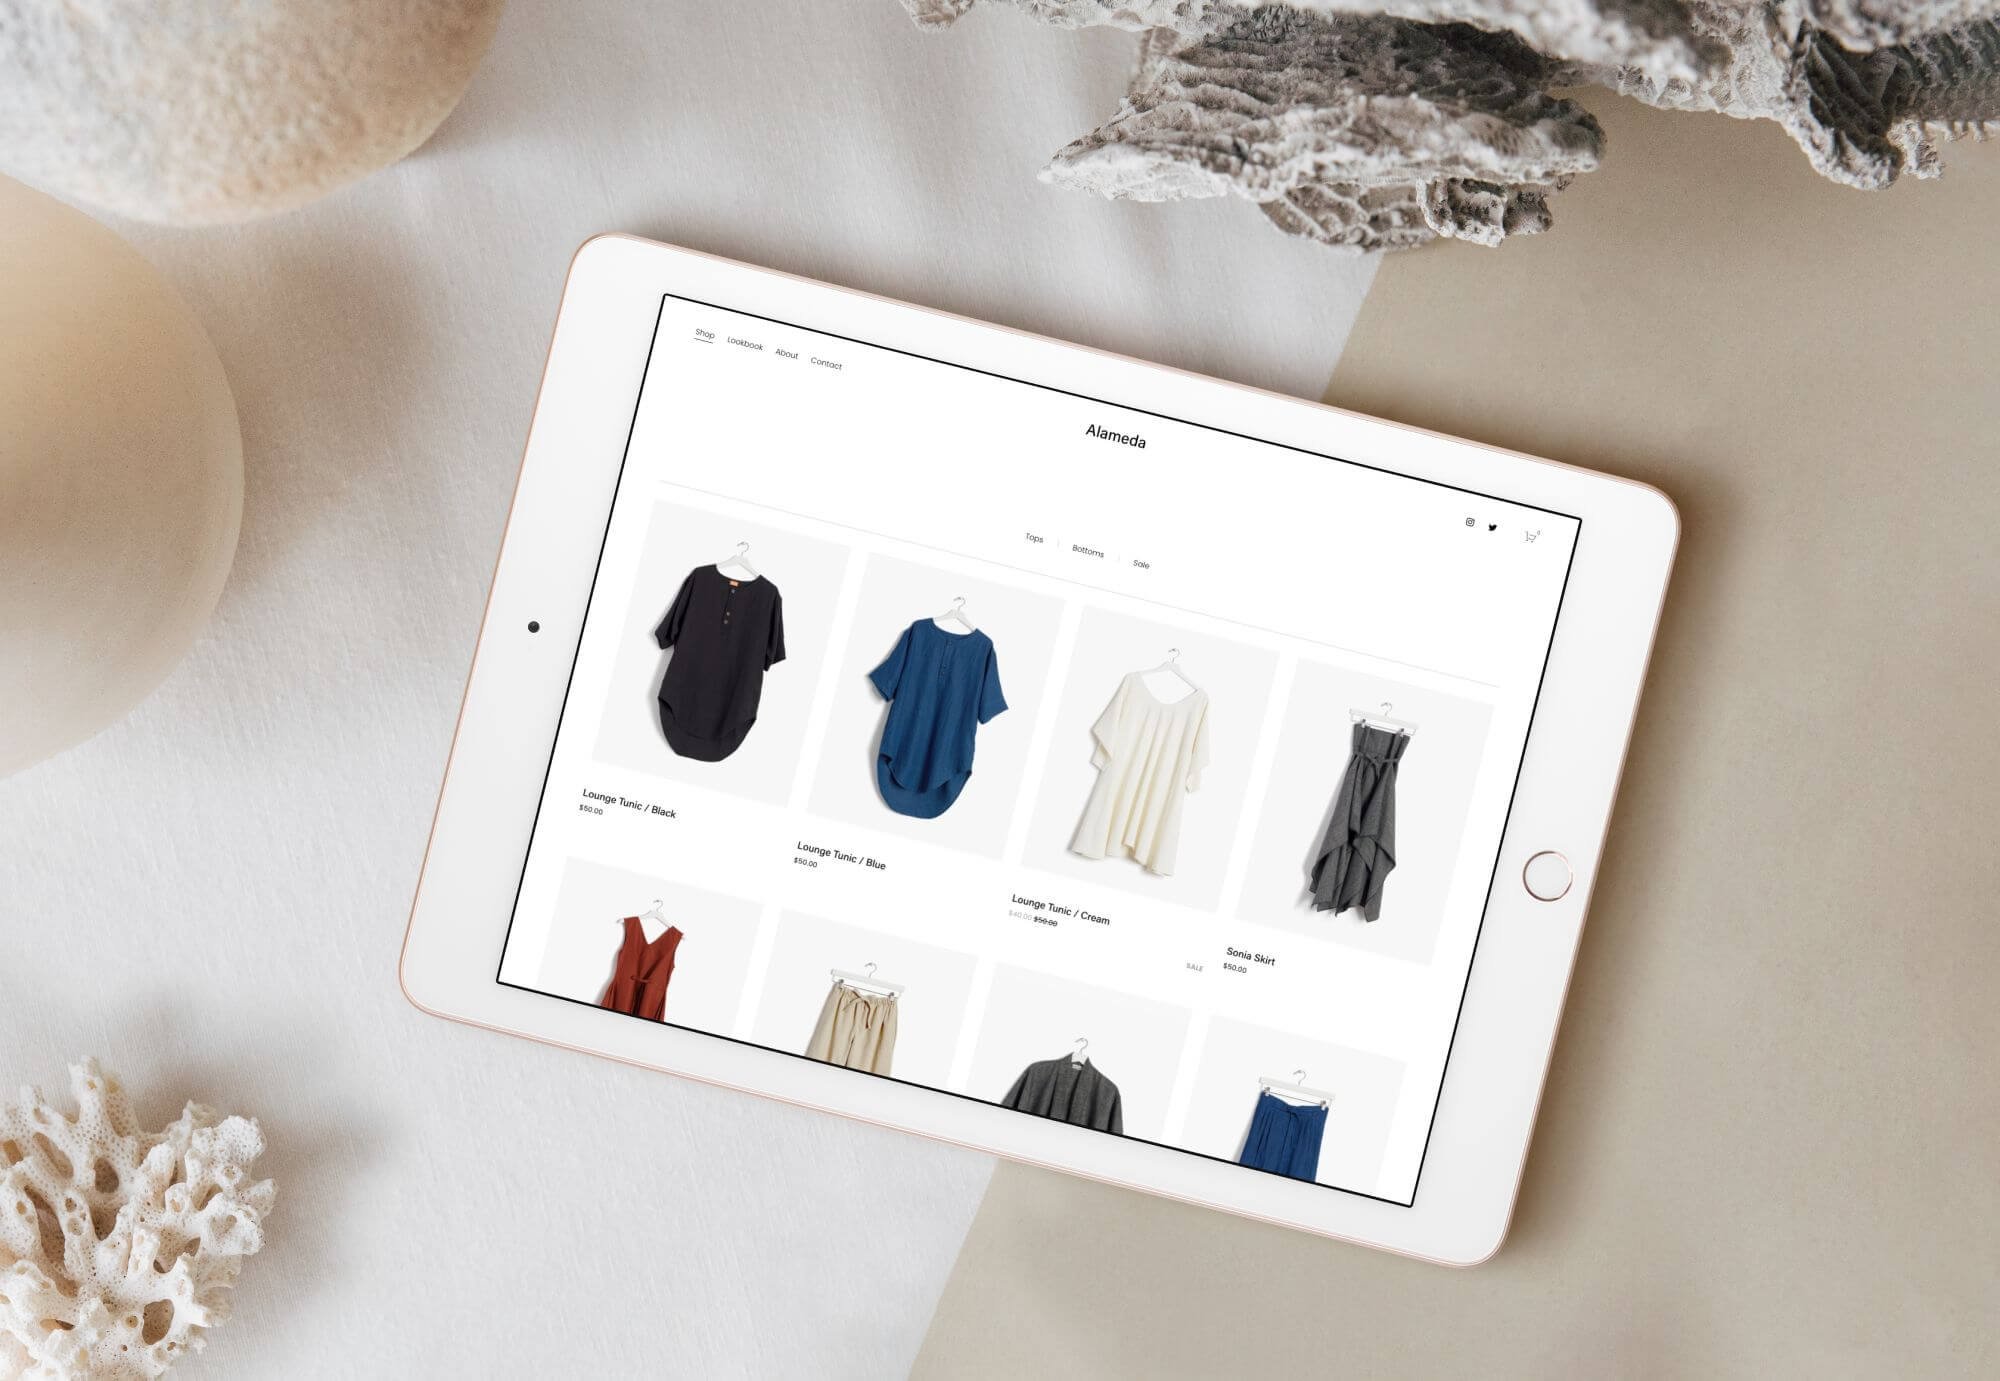
Add a Store Page to Squarespace Site
From Squarespace home menu, go to Pages. Here you will create a new page, specifically a Store page that will house all your products.
Once you’ve created the Store page, you can start customizing the page layout and style before adding products. A few notes:
Layout and styling options for Store page and Product page are limited compared to regular pages. This is because ecommerce interfaces are quite standardized across the Web and Squarespace applies the best practices for you when building their templates.
If you have multiple Store pages, changes in one Store might affect the other (e.g. if you set the image ratio in one store to be 1:1, the other will show the same). See this post for a workaround.
If you need some inspiration to design your shop page, check out 15 Squarespace ecommerce examples.
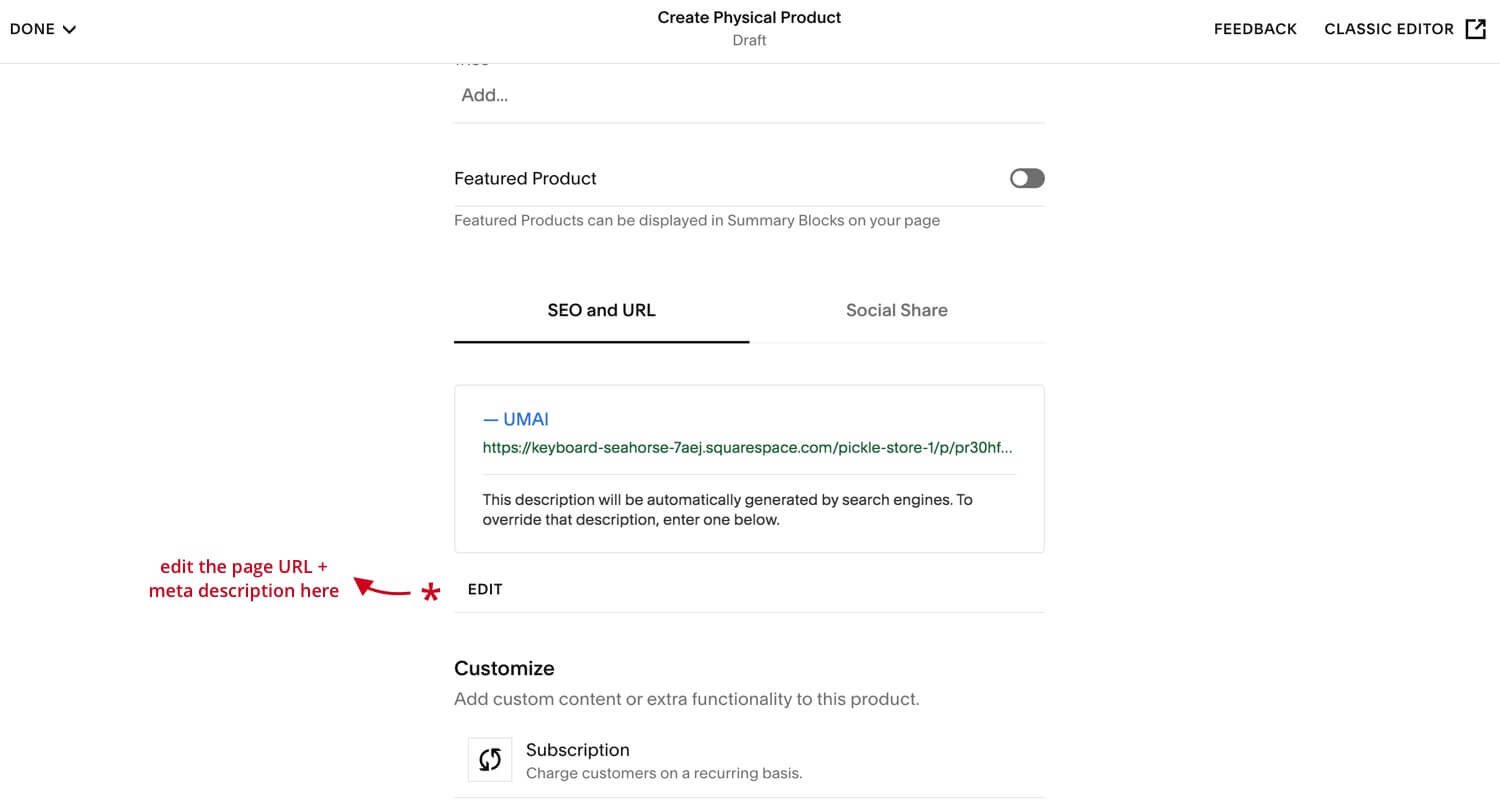
Pro-tip 1: Don’t forget to edit the settings of Store page for search engine optimization. Change the page title to something descriptive (e.g. don't call it Store, use a keyword like British Online Shoe Store). Add a meta description too while you’re at it.
Pro-tip 2: While you’re at the Store page settings, also go to Advanced > Quick View and toggle Enable Quick View on. This allows customers to preview the product description page without leaving the store page.

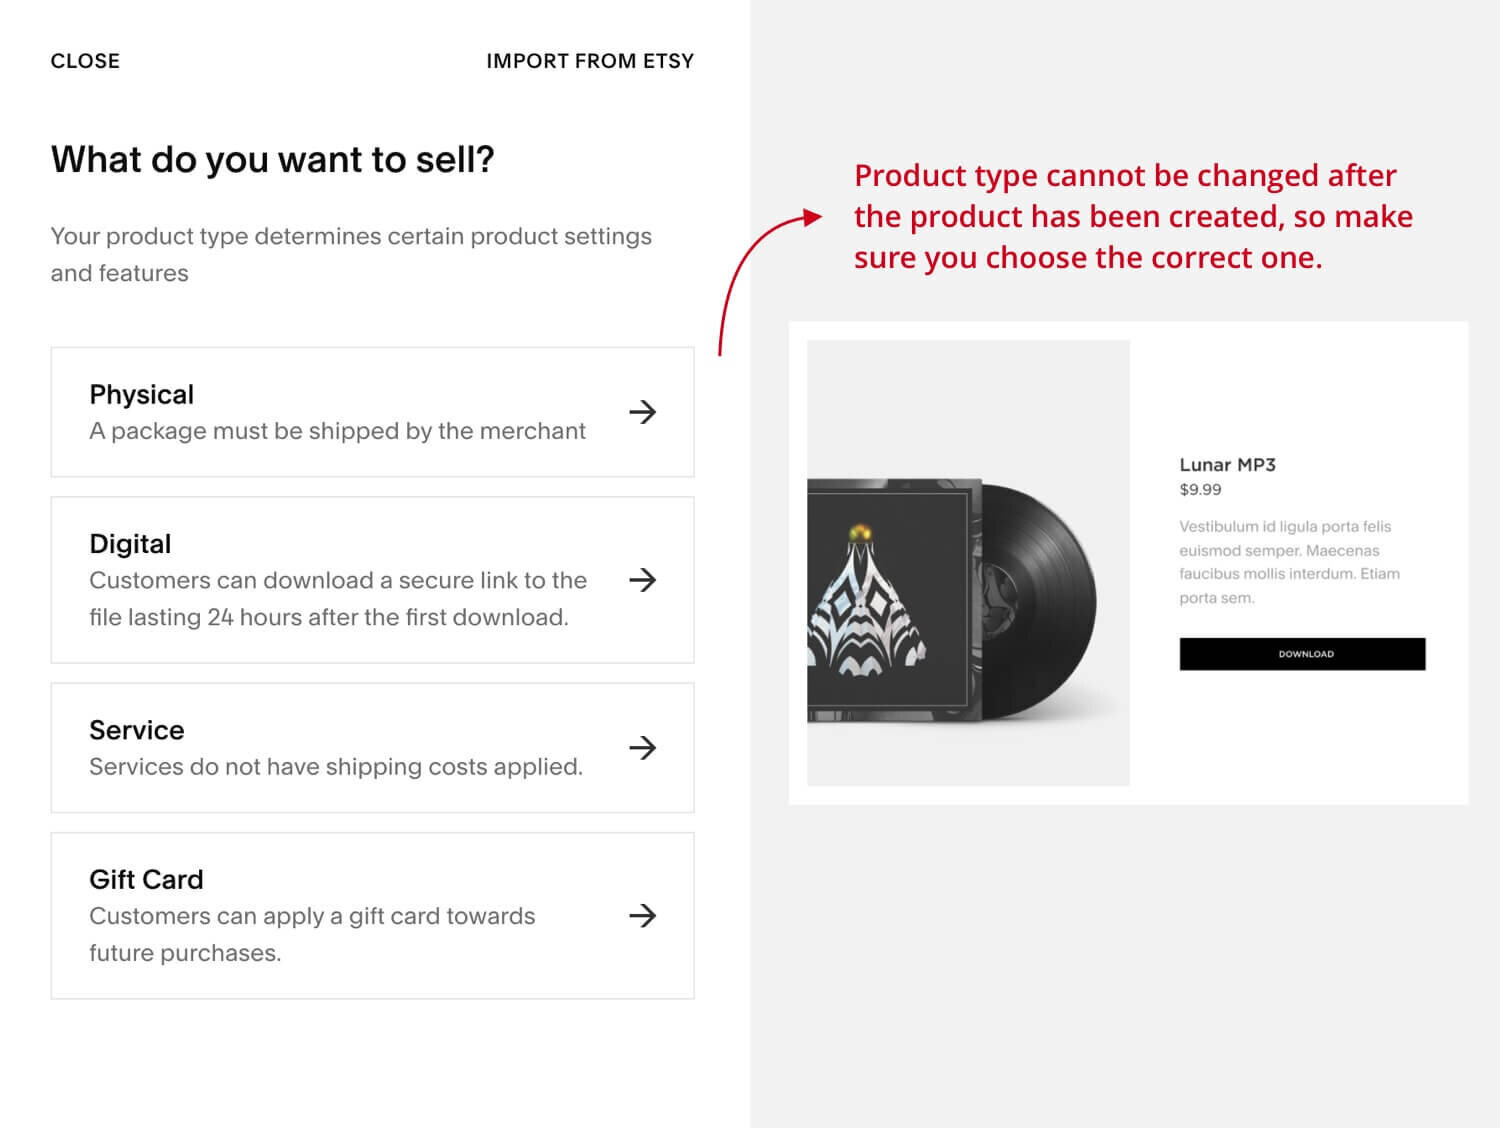
Add Products to Shop
On your Store page, click the “+” or “Add Product” button to start adding products. Make absolutely sure you choose the correct product type because the only way to change the product type later is to redo the entire page.
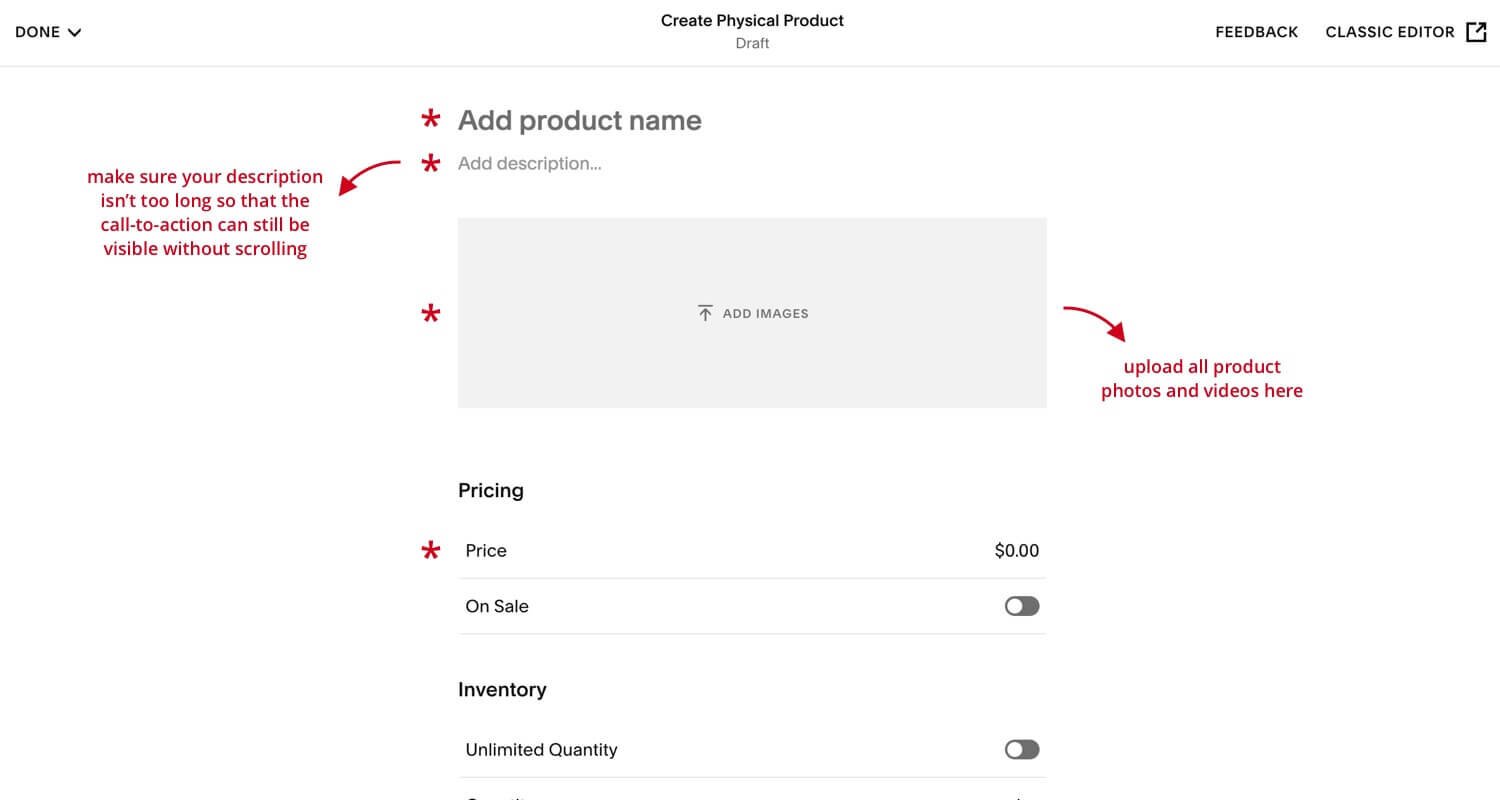
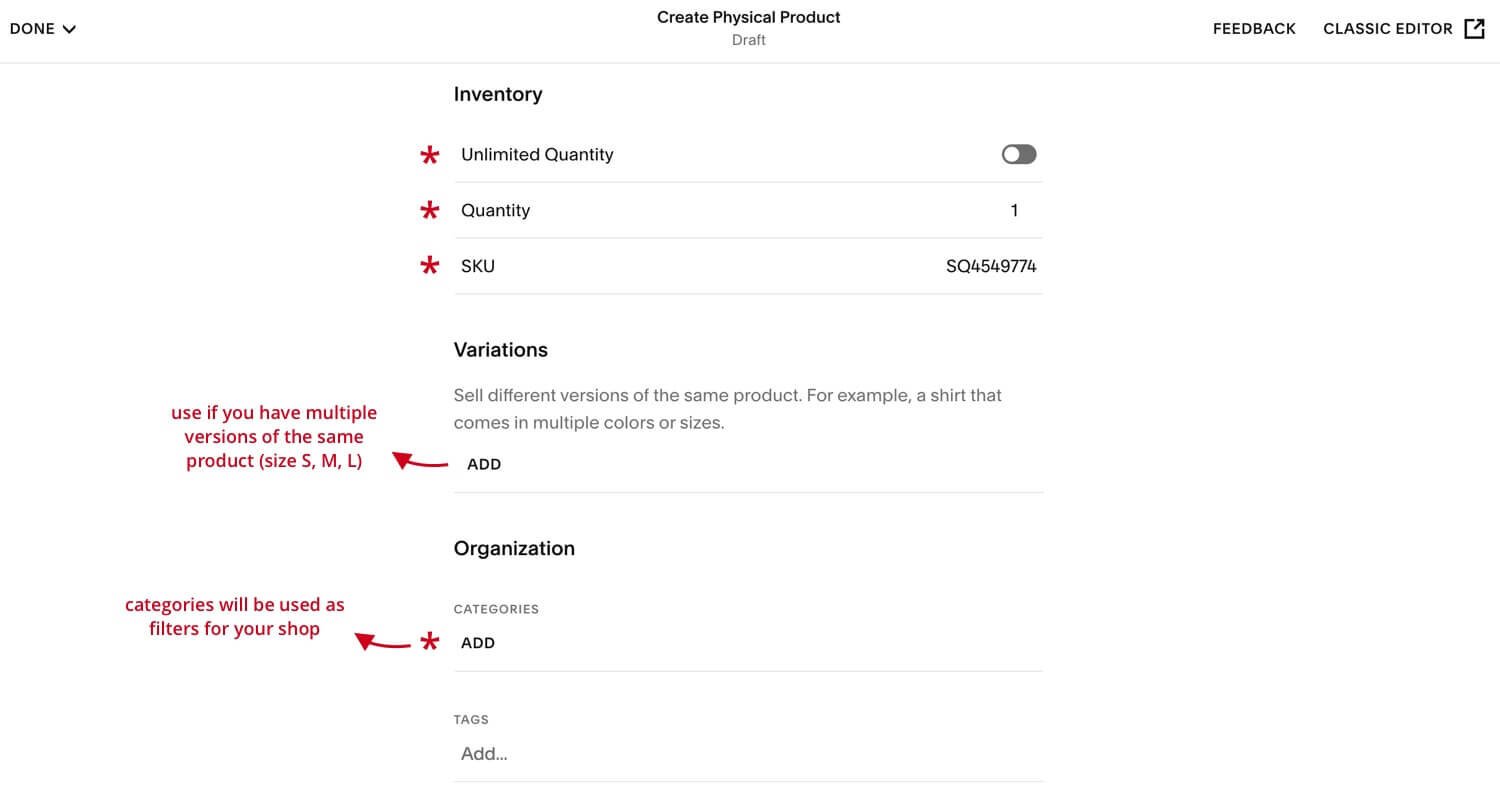
With the product page pop-up opened, you can start adding product details. There are quite a few input fields here, so make sure you go through each and every one of them.
Once you have one product page, you can duplicate it as a template to reduce editing time on other products (granted you have the same product type).
Best Practices
The product page is often where users decide whether to purchase your product. As such, here are some best practices to keep in mind as you edit the product info:
Aim for a short Product Description so that the call-to-action button is visible without scrolling. If you find it hard to keep the Product Description short, try using accordions.
In the Product Description, include important features related to the product (e.g. materials, size, capacity) as well as shipping fees. Hidden shipping fee is a major cause of cart abandonment, while showing free shipping increases sales.
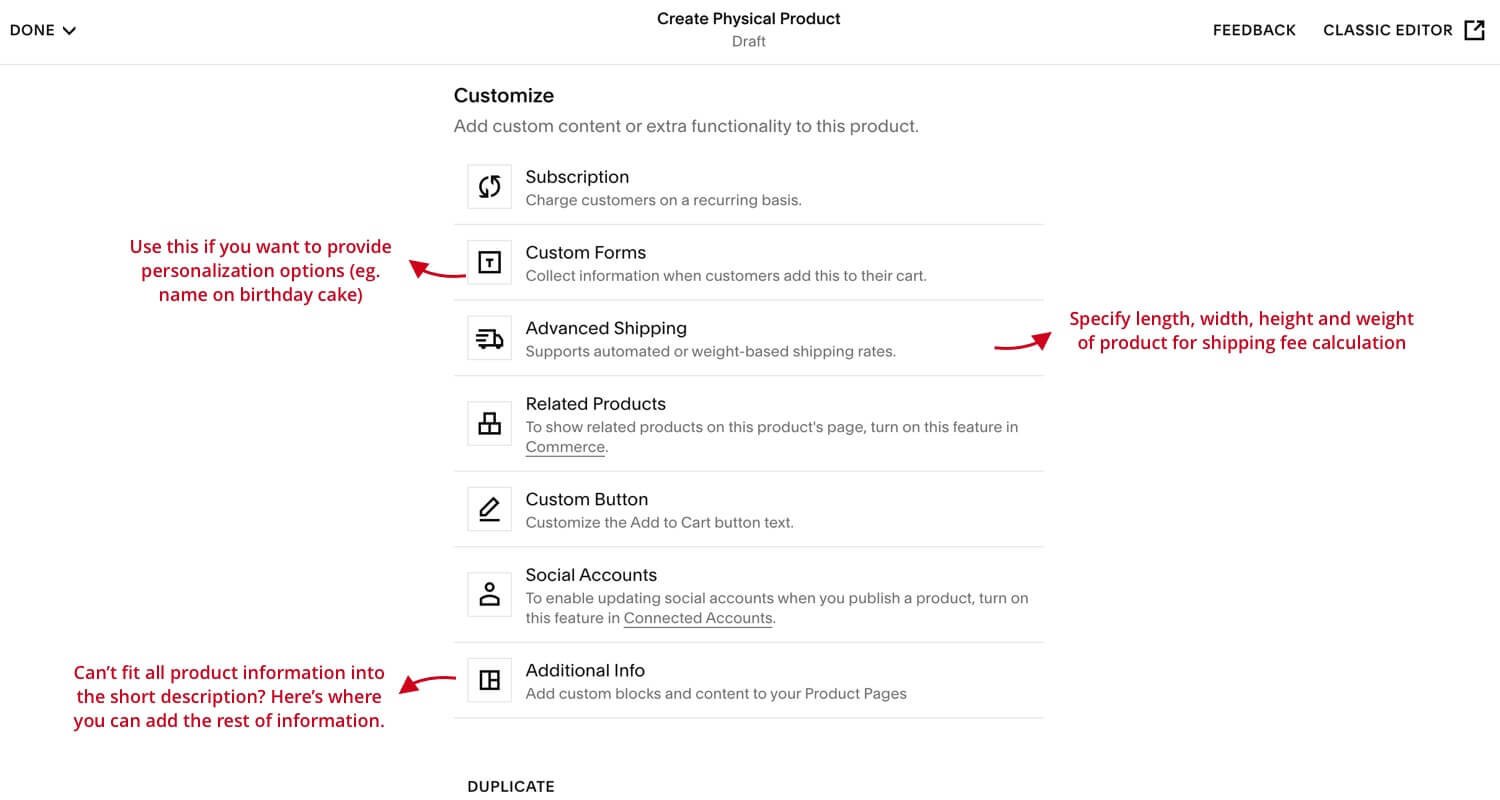
Generally speaking, the higher the price, the more information you will need to provide to help users feel secure and justified before purchase. Use the Additional Info section to elaborate on the product benefits, experience, materials, origins, passion, anything to position your product for the high price point.
There’s no built-in customer reviews feature, but you can use a code block to integrate with wiremo.
Don’t get clever with the call-to-action button label. Make it clear and simple, such as “add to cart” or “buy now”. If you want jazz up it, make sure you do A/B test and know the impact it has on conversion.
When possible, use a video as videos have shown to increase conversion rates.
Variants/Customization
One issue you might run into is with providing personalization options.
If you have just 1 customization option, use a product variant or a custom product form.
If you have more than one but still a small number of customization options, you can use custom product form.
The issue with complex product variants is the total number of options to set up can quickly get out of hand. In this case, you will need to use a smart variant workaround like here.
Once you’re done setting up products, give yourself a pat on the back. The hardest/most time-consuming step is done!
Additional Resources
If you need a bit of writing inspiration, check out product copywriting best practices with examples.
As with the Store page, there are limited styling options on the product pages, though you have more freedom within the Additional Info section. If you need design inspiration for product page, check out 15 Squarespace ecommerce examples.

Connect a Payment Processor
From the home menu, go to Commerce > Payments. Here’s where you can connect your Squarespace site with Stripe, PayPal and Square. Squarespace will automatically change the store currency to match your Stripe/PayPal account currency.
This process is pretty straightforward, with a few notes:
You need to use a PayPal Business account; a personal account won’t work.
You can’t list multiple currencies.
If you want to add a different payment gateway (e.g. PayPal and Stripe aren’t supported in your country), you can add Shopify’s Buy Button for an addition al $9/month which will give you access to many more options.

Set Up Shipping Rules
If you’re not selling physical products, you can move to next step.
To set up shipping rules, from the home menu, go to Commerce > Shipping > Add Shipping Options. Here you can set different shipping rules based on countries. If you’re selling in U.S. and Canada, you can set shipping rules for each city or state/province.
There are 4 shipping options available in Squarespace:
Flat Rate: Apply a fixed rate per order and/or per item. E.g. $25 per order regardless of how many items, or $25 plus 10¢ for each additional product after the first one.
Rate by Weight: Fee get calculated based on the total weight of all items. You will add the weight for each product and Squarespace will do the calculation.
Carrier Calculated: Fee calculated by FedEx, UPS and USPS based on the weight, distance, and dimensions. This’s the most accurate option but it’s only available in US and it requires Commerce Advance Plan.
Free Shipping: Apply free shipping for all orders or for orders that match criteria (e.g. free shipping for orders over $50)
If you find it hard to decide what shipping options to use, have a read at this Squarespace support page and this article, which all contains different suggestions on this topic.
Below are a couple of other Qs that may pop up when you set up shipping on Squarespace.
-
Technically you can’t add shipping rate based on products in Squarespace. But, a workaround to accomplish this is using rate per weight. Essentially, you will be using the weight number as a “tag” to associate a product with a certain price, regardless of what the product’s true weight is. For example, you can have a 1-lb product group that is $10 shipping, and another 2-lb product group that is $15 shipping.
-
First, follow the usual step from the home menu, go to Commerce > Shipping > Add Shipping Options. Choose Flat Rate. You will find the first tab for entering the fee, and the second tab to choose the shipping zone the fee will be applied to. Repeat this process for all countries you want to ship products to.
-
Ah, such a trick question because the measurement standard is shown on product pages but it actually isn’t part of commerce settings. To change from lbs to kgs, from the home menu, go to Settings > Language & Region. Scroll down to Measurement Standard and change the option from the drop-down (imperial is pounds and metric is kilograms).
-
Offering free shipping is a great way to incentivize users to buy more (like Amazon does!). To set up free shipping with a criterion on Squarespace, from the home menu go to Commerce > Discount. Click the + button. You can choose either to give users a discount code or have it automatically applied on orders that meet the requirement (though automatic discounts will require Commerce Advanced plan).
-
To create an option for in-store or curbside pickup, first, navigate to the shipping section (from Home menu go to Commerce > Shipping). Click Add Shipping Option then choose Flat Rate. Enter the information as below:
Option name: In-store pickup
Per order & per item fee: $0
In the shipping zone tab, limit the option to only your local areas
Click save and you’re done!
-
Squarespace has integration with ShipStation which can help you generate labels. You can see more details here and preview the setup process here. ShipStation might be the most popular option, but if you don’t want to use ShipStation, there are also other alternatives. Have a look at this Squarespace shipping extensions post which shows a range of options and who each option is best for.

Set Up Tax Rules*
If you’re selling in the US, you can add automatic tax rates using TaxJar extension. See a guide for it here.
For other countries, you will need to set up tax rules manually. To do this, head to Commerce > Taxes. Here you can hit Get Started and click + button to start adding tax rates for each country or state/province.
If you need help setting taxes manually, take a look at the Squarespace support page for adding taxes and collecting VAT or GST.
*Disclaimer: The info here does not substitute legal or professional tax advice. Please refer to our Terms & Conditions to understand your responsibility with any and all information presented to you by us.

Customize Store Settings
Your store is technically functional by now, but there are quite a few more things to improve your store efficiency and customer experience. First, let’s look at the checkout experience.
1) Squarespace Checkout Experience
A standard shopping experience allows a customer to add an item to the cart with any quantity they wish to buy, then continue browsing until ready to checkout. If your store has different needs, here are options to modify these default settings:
Enable express checkout: This bypasses the add to cart step and take the customer directly to the checkout screen. If you only have one product, this is the ideal path. To activate this feature, go to Commerce > Checkout, scroll down to the Express Checkout and check that option.
Minimum order amount: If you want to set up a minimum order amount, go to Commerce > Checkout. Find the Minimum Order Amount field, check that option and enter the required amount.
Service product limit: If you sell services and want to disable the quantity selection option, go to Commerce > Checkout. Find the Service Product Limits field and uncheck that option.
Store Policy
You should also include store policies in the checkout process, even if you already have a separate page about it on your site and/or already include this information in the product pages.
To add store policies to the checkout process, go to Commerce > Checkout. Scroll all the way down to the bottom and click the Checkout Page: Store Policies button. You can enter the most important policies here and give a link to the full policy page.
Invoice
Another thing to customize is invoices, which is important if your countries have specific requirements for displaying price and tax information on invoices. In the same Commerce > Checkout section, right below the Checkout Page: Store Policies button is the Invoices. Clicking here will take you to the options to customize invoices.
Other Checkout Settings
There are a couple of other customization options you will find in the checkout section:
Abandoned cart recovery: This feature will send an automatic email reminder to customers 24 hours after they add items to the cart but not complete the checkout process.
Mailing lists: Enabling this option if you want to ask customers to subscribe to a mailing list at checkout.
Default country in address fields: Select the country where most of your customers are located.
Shipping and billing address: Check this option to show the shipping address as the billing address by default (customers can always uncheck and enter a different billing address, so there’s no reason you shouldn’t give this as default)
Shopping cart style: If your site uses a dark color scheme, you may want to switch the shopping cart style to “use light color scheme”
“Continue shopping” link in cart: Squarespace’s default option is homepage, but you should change this to the page where users actually browse products
Additional Fields: You can disable the phone number question field here, as well as enabling a custom form if your business requires it (e.g. for customizing the product)
2) Customer Notifications
Another part of the checkout experience is email notification. You can customize Squarespace’s default customer notifications by going to Commerce > Customer Notifications.
Here’s what you should customize in Squarespace customer notifications:
In the Global Email Styles, make sure you use the brand colors and fonts (or something very similar to it). You can also add a logo or company name to the header.
In the Business Settings, use a real email rather than a no-reply email for notifications. This allows customers to reply to the invoice and contact you if they have questions. You can also include other business information here.
In the General Orders, go through each email template and change the email copy if needed. Squarespace’s default templates are written in a neutral (and a bit cold) voice, so if this doesn’t feel right for your brand voice, change it.
If you enable other features like POS, abandoned cart recovery, etc., review other email templates in the same way as the ones in the General Orders section.
3) Other Settings
As these aren’t “required” for your store to be running functionally, I’d recommend going through all other options in the Commerce section in your free time to take advantage of the ones that can optimize your store. There are honestly too many customization options to list all, so I’m only going to highlight the most useful/common ones here.
Adding urgency is an effective way to motivate users to take action. In Squarespace, you can add a limited availability label (e.g. only 1 left!). Under Commerce, you will find Product Status. This’s also where you can adjust the copy for when products are out of stock. For example, if you sell services, you may want the label to say “sold out” rather than “out of stock”.
You can turn on the waitlist feature to allow customers to opt-in for notification when the product is available again. To do this, go to Commerce > Waitlists > click the “enable it in Settings” link.
Another gem in the Commerce section is Related Products. You can change the product sorting here to show the newest products or the ones with the highest quantity.

Test & Go Live
Your site is so, so close to launch! But before we go live and break out that champagne, let’s test the site and make sure everything runs smoothly.
There are two ways to test: using test mode and testing in a real environment.
Test Mode
You can enable test mode from Commerce > Payment > toggle the Test Mode to be ON.
This feature will auto-generate a fake credit card at checkout, so that you can go through the whole shopping experience almost as a real customer (except that PayPal won’t work).
This is a great option to test all features as you can test, edit, repeat as many times as you need without any extra action (e.g. refund yourself). Just don’t forget to turn off the test mode when you’re ready to launch the shop - I forgot it one time and there was a failed transaction the next day 😭.

Test Real Checkout
The second way is doing real-environment testing. You can either place an order then refund yourself, or set a temporary low price on one product (e.g. 10¢) then buy it as normal. I usually do the latter to avoid the refund wait time. If you want to go with the buy-then-refund route, take a look at this article for order refund instruction.
And that’s it! After the testing step, your Squarespace online shop is ready for launch!
Bonus: Advanced Customization
There are many third-party plugins and code snippets shared on the Squarespace forum – ecommerce topic. They can open up possibilities to customize your Squarespace ecommerce site in ways you didn’t think were possible.
As adding codes can slow down your site (and loading speed is an important factor for conversion), choose to implement only the ones you think will make a difference to your store. Below are some popular third-plugins plugins to optimize Squarespace ecommerce sites:
Cart drawer (so that users can view the cart without leaving the page) – $40
Advanced filters (very useful if you have a large store) – $70
Display variants as color/size/fabric swatches instead of drop-down – $59
Sticky product filters for top bar or for sidebar – free
Mega menu – $167
Good luck with setting up your Squarespace ecommerce site! If building a website isn’t your strength and you’d like to outsource or getting guidance on it, check out my Squarespace web design services!
