
7 Tips for Managing a Large Squarespace Website With Ease
If “Just do it” hasn’t been taken by Nike, it should have been Squarespace’s tagline because the majority of their users learn the platform by trial and error.
While it’s great that Squarespace is so intuitive, this can lead to many inefficiencies in the way a website is set up.
These inefficiencies become problematic when your website grows bigger.
Recently, we had a client with a website of a hundred pages. Because they didn’t set up the backend properly, there were several pages where content had to be uploaded twice, and many broken links were found which affected the user experience.
To help you run your website optimally, we’ll share Squarespace tips for managing a large website in this post.
Let’s give your website a boost in efficiency!
File Management the Smart Way
Tip 1: Keep PDF files organized by uploading them to a dedicated page
The quickest path to uploading a PDF file to Squarespace is to create a link from the side menu. However, this can lead to a lengthened, cluttered side menu, which makes it hard to find what you need and to reposition pages.
Instead, consider using a single page to house all your files. This facilitates easier retrieval of any file when needed and avoids disrupting the navigation structure.

Use a single page to store PDFs links instead of disrupting the navigation
Tip 2: Whenever possible, replace old files without changing the link
Sometimes you make updates to a PDF file on your website offline. If you simply upload the new file to Squarespace, it will generate a completely new link.
Having different links for different versions of the same document can cause confusion and mix up. Instead, swap the old file with the updated one by following 3 steps:
Firstly, go to Link Editor and delete your old PDF. Because each URL is unique, you have to delete the old PDF; otherwise, Squarespace will not regenerate this URL.
Secondly, before uploading the new file to Squarespace, make sure the name of your new PDF is exactly like your old PDF.
Finally, upload your updated PDF. Because of the file name, Squarespace will generate the same URL for your updated PDF. Voila, now users who go to that URL will see your new file content.
Tip 3: Manage image library
All the images you have uploaded to Squarespace are stored in your website’s image library. Instead of uploading new ones every time, you can pull images from there.
Therefore, when you upload an image to Squarespace, consider the reusability of it. Assign a meaningful file name to facilitate easy searching within the library. For example, in the example below, providing each image with a descriptive keyword allows for quicker retrieval.

Assign meaningful file name for an easier reusability
Increase Content Reusability with Collection and Summary Block
Tip 4: Blog can be used for more than just blog
Squarespace's Blog collection feature is primarily designed for blogging, but its versatility extends beyond that.
You can use it to organize and display information neatly. For instance, instead of cluttering the side menu with individual bio pages for each team member, create a single Blog collection named "Team." Each team member can then have a separate "post" within this collection, contributing to a more organized navigation structure.
Another advantage is that this approach provides clear and logical URLs for users. Instead of a generic "yourwebsite.com/david," users will see "yourwebsite.com/team/david" making it evident that David is a team member page and not just any content page.

Use Blog collection to organize team member bio pages neatly
Tip 5: Use summary block to reuse content for a clean look
The Summary block feature lets us use the same content from a Collection (Blog, Products, etc.) on various pages, avoiding the need to upload it multiple times.
You also can make your blog or shop more organized by using categories, tags, and the featured toggle in a Summary block.
Here are a few examples of how to leverage the summary block.
Example 1: The Live Yoga’s website creates a detailed bio for each instructor using the Blog collection. They then use the Summary block to display just the picture and name of instructors throughout the website.

Use of the Summary block to display team members
Example 2: Sunday State, an online store website, effectively pulls diverse content to its homepage and effortlessly creates a best-selling page by leveraging these features.

Use of the Summary block to display online store items in the homepage
Save Time with Special Section Features
Tip 6: Auto layout section to save time adjusting layout
In Squarespace 7.1, Auto Layouts are unique sections that automatically present content in columns, rows, carousels, or slideshows according to your chosen settings. Your content will be neatly arranged without the need for manual adjustments block by block. The mobile version is also handled seamlessly, saving you time on mobile editing tasks.
This feature is particularly useful for content that requires frequent updates, such as: current team members, client testimonials, services, etc.
This feature is a little bit hidden. To add an auto layout section, search for a preset that includes an icon labeled "ⓘ" in the top right corner. Squarespace provides an explanation when you hover over this icon.

How to find and add an auto layout section in Squarespace
As an example, here’s the Organic Headshot website uses auto layout sections to neatly showcase their current team members on about page. This makes it easy for them to add new team members or quickly update details like descriptions or images.

Use of auto layout sections to showcase team members in Squarespace
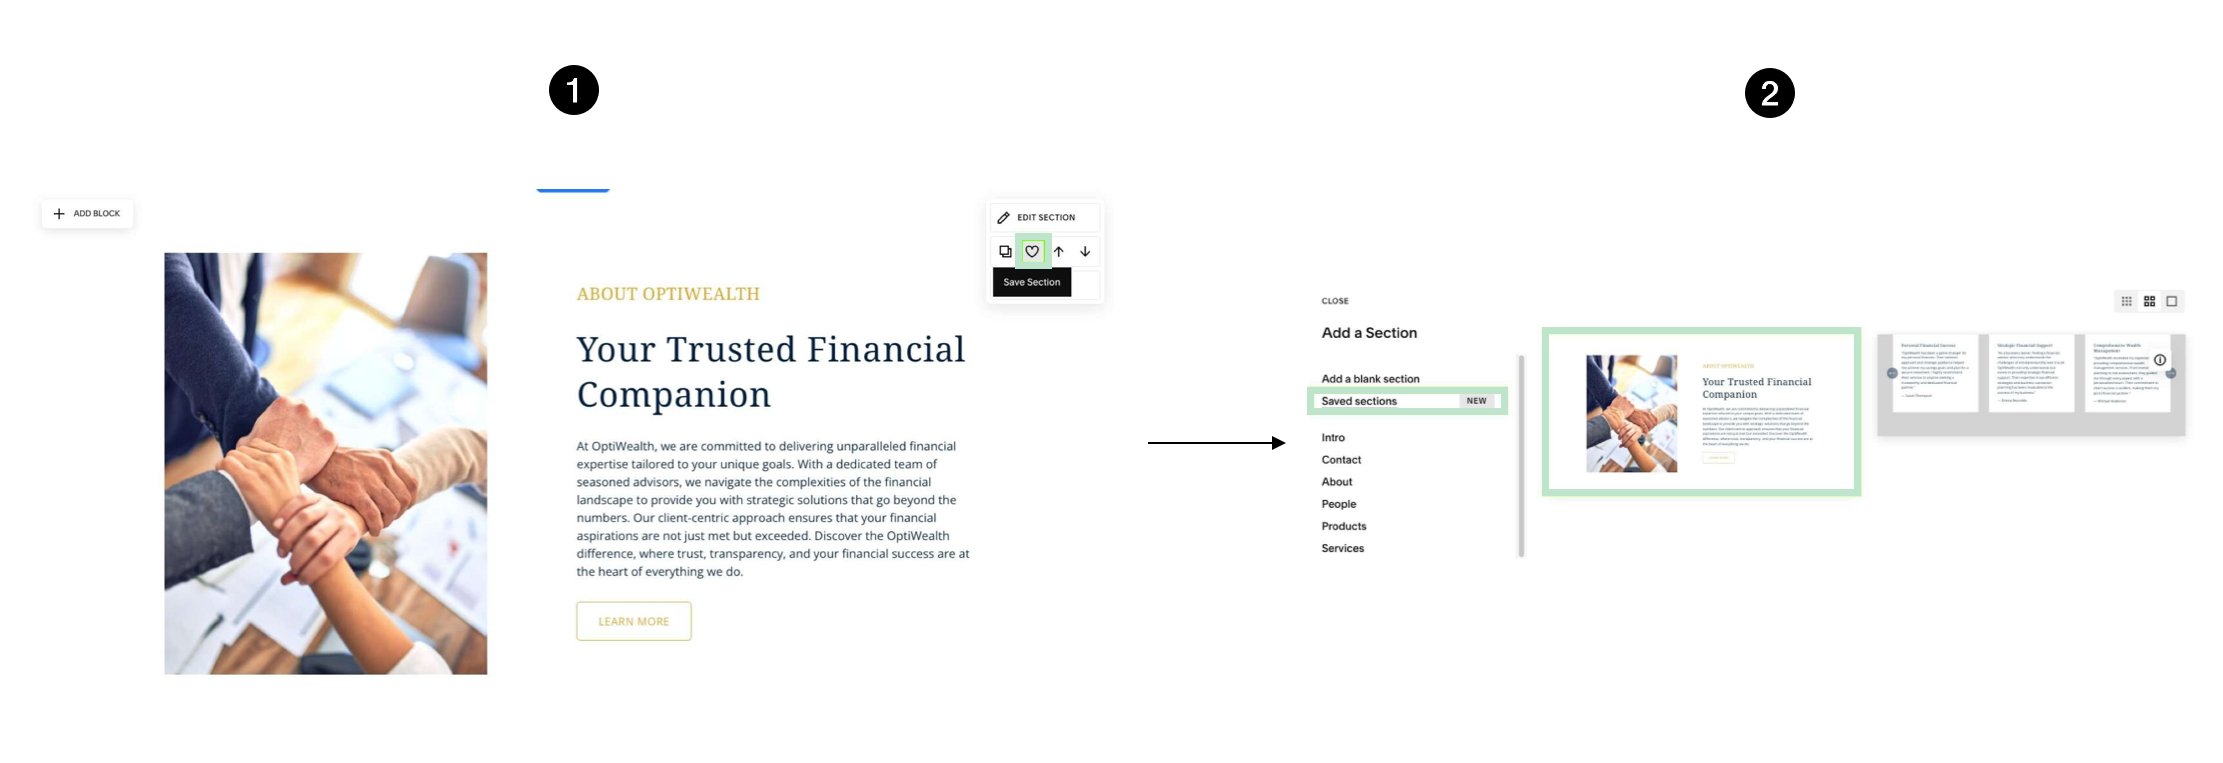
Tip 7: Saved section to cut down design time
You might be familiar with duplicating a section within a page, but did you know that you can also duplicate a section to another page? This is now possible with a recently released Squarespace feature: Saved Section.
To do this, go to the section you want to duplicate, click on the heart ♡ icon below "Edit Section" to save it as a favorite. Then, on another page where you want to use this section, click "Add Section," and you'll find a "Saved sections" component. Your favorite section will be there, ready to be reused.
Note: the maximum number of saved sections per website is only limited to 50.
Use of Saved sections in Squarespace
Conclusion
We hope these Squarespace tips will help you create a more efficient website! Check out these blog posts below for more ideas to improve your site!
If you need help with your website, reach out to us for a free consultation.