
How To Add PDF (Or Any Files) to Squarespace
The ability to host files on your website is very useful. It allows you to share a downloadable resource with your audience or ask buyers to submit images related to their orders. Though Squarespace allows uploading files, this feature is not easy to find for most users.
In this post, we’ll cover different options to upload files to Squarespace and some common questions on this topic.
Before we dive in
You can upload many file types to Squarespace, such as PDF, JPEG, ZIP, DOCX etc. However, Squarespace has a file size limit of 20 MB or smaller. If you have larger files, you should reduce their sizes before uploading them.
How to upload downloadable files to Squarespace
You can use this process for:
Sharing a lead magnet with subscribers who sign up for your newsletter
Storing a client document like Welcome Guide, Service & Pricing Guide, User Guide etc.
Storing a resume to send to potential employers
Here’s the video tutorial of the steps to upload files to Squarespace:
Steps to upload a downloadable file:
1) Go to Pages menu
2) Under Not Linked section, click the + button and choose Link. Click the gear icon to open the Link Editor popup.


3) Go to File. Click Upload File and select a file from your computer
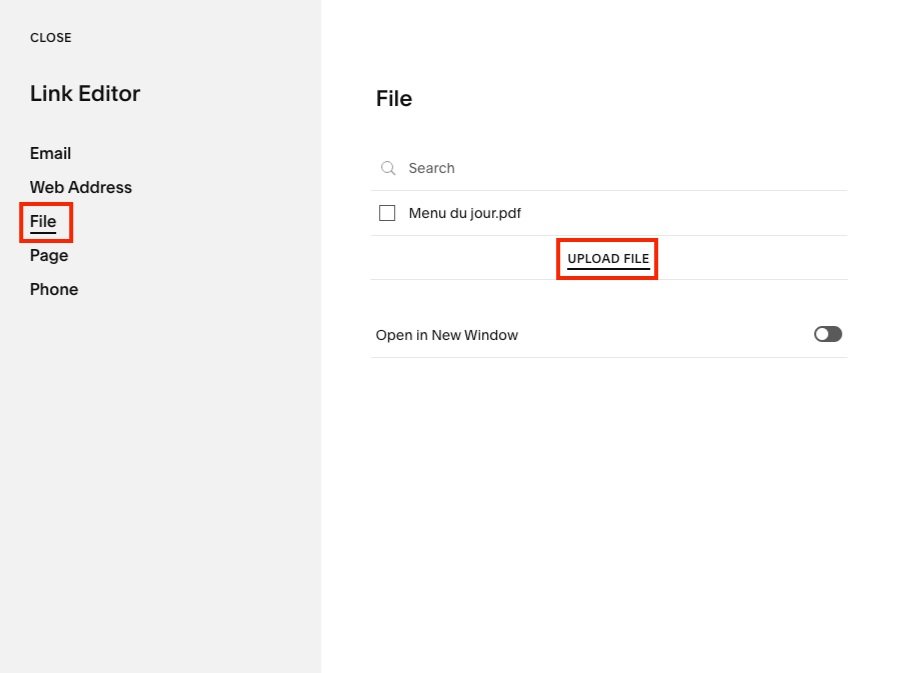
4) After a quick second you’ll see the file name appear, which means the file has been uploaded to your Squarespace storage.
Select the checkbox next to the file name. Click Save. This will bring you back to the Link Editor popup where you’ll get the URL of the file.

5) On the Link Editor popup, you will see a URL link has been generated that starts with /s/. This is the link to view and download the file you’ve just uploaded.
If you want to embed the file within your website (eg. on a website button or image), use this shortened link format. In our example, this is /s/Menu-du-jour.pdf.
If you want to send the file externally (eg. on an email or guest blog), you will need to add your domain to the link. In our example, this would be https://taylornguyen.ca/s/Menu-du-jour.pdf.
By this point, your work is done 🎉. The file has been uploaded and you’ve got the file URL. You can exit the Link Editor popup without saving.
If you add a Link Title and click Save, the PDF file link will be added to your Not Linked menu. This acts as a shortcut that allows you to get the file’s URL link quickly. When you no longer want the shortcut, you can delete the link on your Pages menu and the file will still be functional.

More ways to access the Link Editor
You can actually upload files to Squarespace from multiple starting points, not just from the Pages menu. When you add a button, an image, or a hyperlink, there’s a gear icon next to where you enter a link. That’s the entry point to Link Editor, where you can then follow steps 3-5 to upload a file.
Frequently Asked Questions
Can PDF files uploaded to Squarespace be found on Google?
Yes, Google can crawl and index a PDF file like all other content on your website. If the content on your PDF is relevant to a user’s search query, the file may appear in the search results.
However, the likelihood of ranking is lower because a PDF file doesn’t have SEO features like a webpage (eg. meta description, heading tags…).
If you want to be extra careful for the file not to show up, use a dummy file name instead of a searchable phrase.
What if I want to display the file on my website instead of a link to the file?
If you want to display files on a page, you will need to upload the file to a third-party application (eg. Issuu for PDF), then use code block to embed it in Squarespace.
This might be hard if you don’t have coding knowledge. A workaround here is to screenshot a page on your PDF and display the image as a file preview, then link that image to the full PDF file.
How can I update the file content without changing its link?
You need to update the file content, but you’ve added the file link to many places and it’s inconvenient to change. Fret not, here’s what to do:
First, before uploading the new file to Squarespace, make sure the name of your updated PDF is exactly like your old PDF.
Secondly, go to Link Editor and delete your old PDF. Because each URL is unique, you have to delete the old PDF, otherwise Squarespace will not regenerate this URL.
Finally, upload your updated PDF. Because of the file name, Squarespace will generate the same URL for your updated PDF. Voila, now users who go to that URL will see your new file content!
How to upload files for custom coding
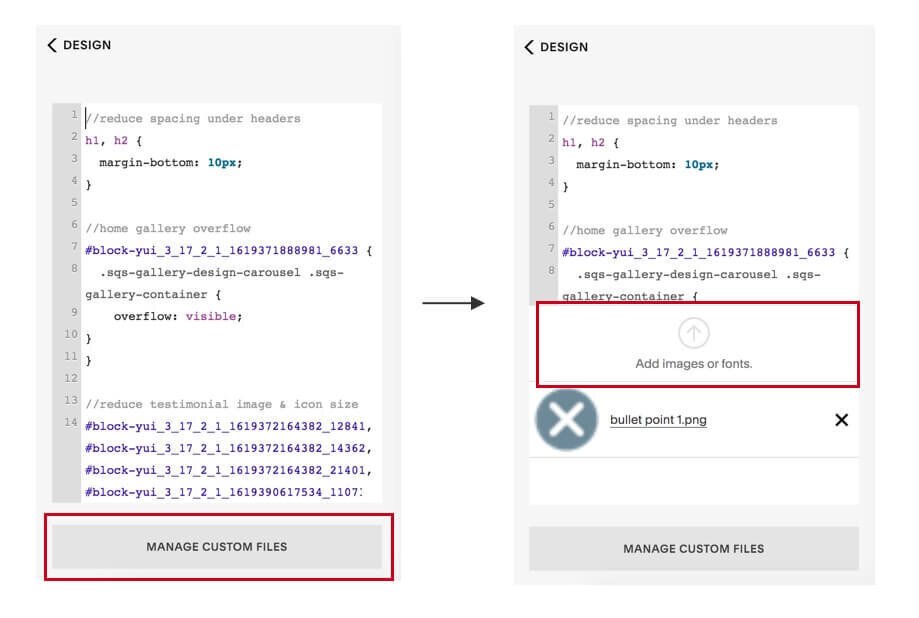
This feature can be found in the Custom CSS section.
From the home menu, go to Website, then scroll to the bottom and click on Website Tools, then on Custom CSS.
Click the arrow button on Custom Files to select image or font files. Once the file has been uploaded, click on it to get the URL displayed on the code areas.
Watch the tutorial video below to follow this process step by step:
How to allow customers to upload files on a form
Though Squarespace has a built-in form builder, it doesn’t allow you to accept file uploads from visitors.
The workaround Squarespace has for this is to use a third-party tool called Wufoo.
Basically, you will create a form in Wufoo then embed it on your Squarespace site using a Code Block. With this approach, you will have to pay a monthly subscription to Wufoo.
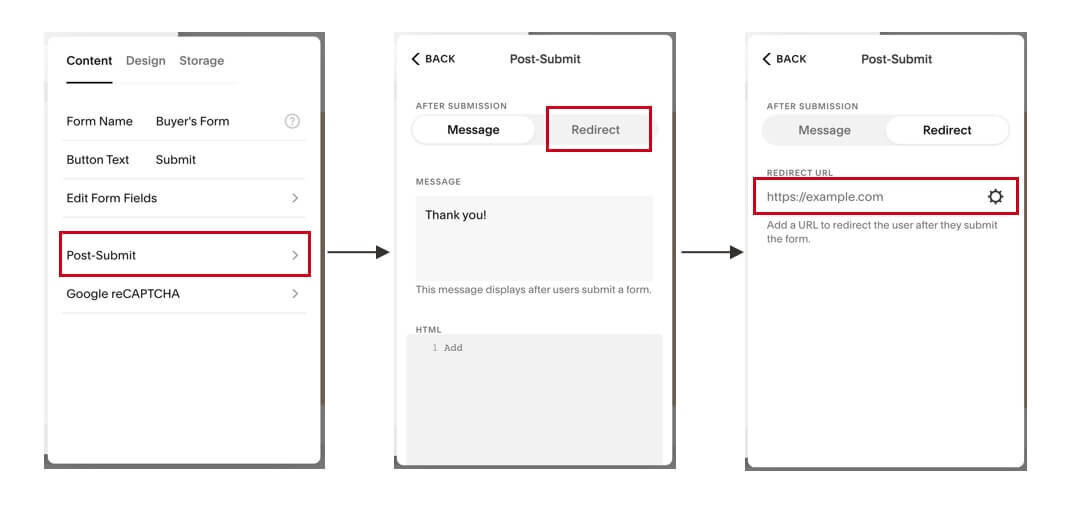
If you want a free alternative to allow visitors/customers to upload files, you can use a redirect after form submission.
For example, prospects will fill out a request form on your website and once they hit the submit button, they will be taken to a Google Forms page to upload files. The files will then be stored in your Google Drive folder.
To create a post-submit redirect, go to Post-Submit in the Content tab. Click Redirect, then enter the URL to the file uploading page in the Redirect URL field. Click Save and don’t forget to test the flow before making it public.
That’s all on the topic of uploading files to Squarespace. If you have any questions, leave a comment below and I’ll do my best to help you out!